Testing Spring Boot Application using WireMock and JUnit 5

In this world of Microservices, we want to build and ship things faster. When we ship our code, we want to make sure we ship well tested quality code. Hence, testing our code becomes very important. Since testing our code is so important, today we have many tools to help us write efficient tests.
In this article, we will discuss one such tool named Wiremock along with Junit 5, that we can use to simulate other services on which our app depends during integration testing of the Spring Boot application.
Let us start with WireMock.
What is WireMock?
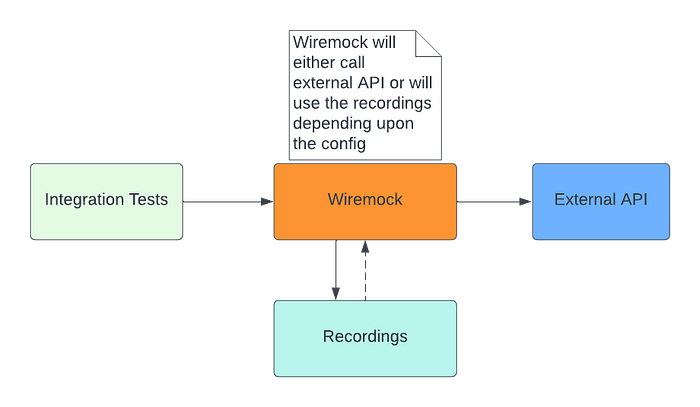
WireMock is a library for stubbing and mocking web services. It constructs an HTTP server that acts as an actual web service. In simple terms, it is a mock server that is highly configurable and has the ability to return recorded HTTP responses for requests matching criteria.
WireMock has a feature called Record and Playback. It can create stub mappings automatically from requests it has received. Combined with its proxying feature this allows us to “record” stub mappings from interaction with existing APIs. When in action, we have the option to either call the external API and capture the response or use one of the earlier recorded stubs to reply to the caller without calling the external API.
Why do we need WireMock?
Suppose our SpringBoot Application calls external applications and this call to external services bears some cost. However, we can’t test the application without calling the external services. In this case, we can use WireMock to mock the external applications while testing the REST API that we are developing in SpringBoot.
WireMock can be used as a library or as a standalone process. In this tutorial, we will use it as a library. Later, we will see how we can use WireMock to mock the external applications while testing the REST API that we are developing using SpringBoot.
What is JUnit 5?
JUnit is a unit testing framework for the Java programming language. JUnit has been important in the development of test-driven development and is one of a family of unit testing frameworks, which is collectively known as xUnit that originated with SUnit.
Unlike previous versions of JUnit, JUnit 5 is composed of several different modules from three different sub-projects.
JUnit 5 = JUnit Platform + JUnit Jupiter + JUnit Vintage
The JUnit Platform serves as a foundation for launching testing frameworks on the JVM. It also defines the TestEngine API for developing a testing framework that runs on the platform. Furthermore, the platform provides a Console Launcher to launch the platform from the command line and the JUnit Platform Suite Engine for running a custom test suite using one or more test engines on the platform.
JUnit Jupiter is the combination of the new programming model and extension model for writing tests and extensions in JUnit 5. The Jupiter sub-project provides a TestEngine for running Jupiter based tests on the platform.
JUnit Vintage provides a TestEngine for running JUnit 3 and JUnit 4 based tests on the platform. It requires JUnit 4.12 or later to be present on the classpath or module path.
Let’s create a simple REST API using Spring Boot and JAVA Config. Then we will perform an integration test of our application using the JUnit 5 and WireMock.
Prerequisites
Before we begin, we must ensure that the following pre-requisites are installed on the local machine:
- Maven
- Java 17
Steps to Build
- Set up the Spring Boot Project
- Include Additional Maven Dependencies
- Furnish the Configurations
- Define a DTO Class
- Define the Rest Controller Endpoints
- Construct the Service Layer
- Start the Application
- Test the Application with Swagger-UI
- Add Integration Test
- Conclusion
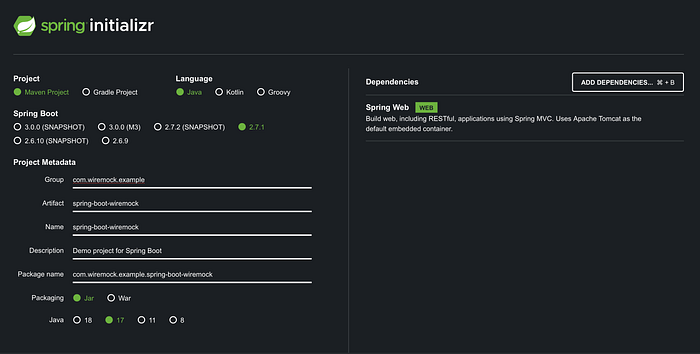
1. Set up the Spring Boot Project
For this tutorial, we are using JDK 17 and Spring Boot 2.7.1 project. Use start.spring.io and create a sample project using the below artifacts:
- Spring Web: Build web, including RESTful, applications using Spring MVC. Uses Apache Tomcat as the default embedded container.
2. Include Additional Maven Dependencies
Add the additional dependencies, shown below, to our project to enable Swagger, Lombok, WireMock, and JUnit for our application.
<dependency>
    <groupId>org.springdoc</groupId>
    <artifactId>springdoc-openapi-ui</artifactId>
    <version>1.6.9</version>
</dependency>
<dependency>
    <groupId>org.projectlombok</groupId>
    <artifactId>lombok</artifactId>
    <version>1.18.24</version>
    <scope>provided</scope>
</dependency>
<dependency>
    <groupId>com.github.tomakehurst</groupId>
    <artifactId>wiremock-standalone</artifactId>
    <version>2.27.2</version>
    <scope>test</scope>
</dependency>
<dependency>
    <groupId>org.junit.jupiter</groupId>
    <artifactId>junit-jupiter-engine</artifactId>
    <version>5.8.2</version>
    <scope>test</scope>
</dependency>Swagger: Swagger is an open-source tool to develop APIs, interact with APIs, and mainly generate documentation for APIs.
Lombok: Java annotation library which helps to reduce boilerplate code.
WireMock and JUnit: for Integration testing.
3. Furnish the Configurations
3.1 Configure RestTemplate
To call an external API we need to create a RestTemplate instance. Let’s start with that. Spring Boot >= 1.4 no longer automatically defines a RestTemplate but instead defines a RestTemplateBuilder allowing us more control over the RestTemplate that gets created. We can inject the RestTemplateBuilder as an argument in our @Bean method to create a RestTemplate:
@Configuration
public class ApplicationConfig {
    @Bean
    public RestTemplate restTemplate(RestTemplateBuilder builder) {
        // Do any additional configuration here
        return builder.build();
    }
}
3.2 Configure application.yml
application.yml file contains all the configuration required by our application during runtime. It also contains externalized configurations. Here, we will just specify our application name and externalize the URL for the dependent service. We will use this URL later to connect to the external service.
spring:
  application:
    name: "Sample Spring Boot Application"

universitiesBaseURL: http://universities.hipolabs.com
3.3 Configuration to read external properties
We can bind the properties defined in the application.yml file to a Java class using @ConfigurationProperties. This annotation allows to map the entire properties and yml files into an object easily. The @ConfigurationProperties annotation takes a prefix parameter, and binds all the properties with the specified prefix to the Java class.
@Configuration
@ConfigurationProperties(prefix = "wiremock-config")
@Data
@Profile("integration")
public class WireMockConfig {
    private List<WireMockProxy> proxies;
}
In this article, we will use the WireMockConfig class to read all the configurations related to WireMock defined in application-integration.yml file. We will be defining this application-integration.yml file when we write the integration tests in Step 9. We will need these configurations during the Integration test.
4. Define a DTO Class
In this application, we will call some external API and then map the JSON response of the API to this DTO UniversityDTO.
@Data
@JsonIgnoreProperties(ignoreUnknown = true)
@JsonInclude(JsonInclude.Include.NON_NULL)
public class UniversityDTO {
    private List<String> domains;
    private List<String> web_pages;
    private String name;
    private String country;
    private String alpha_two_code;
}
5. Define the Rest Controller Endpoints
Finally, let us write some APIs that can be exposed to the clients. This API will call some external APIs and return the results to the client. Here, we are using one of the free API listed in Apipheny for demonstration purposes. We will use the Universities List API to get a list of universities in a specified country. We will not be validating the response, as we are just simulating the scenario where in our application we may need to call some APIs, do certain processing on top of that and then return the results.
In the above code from line 22to 23 we are calling the method getUniversitiesForCountry of the service class, for fetching the list of all universities for the given input. Then we return the result to the caller.
Next, let’s see how we are getting the data from the external API.
6. Construct the Service Layer
Let us construct the Service Layer for our application. The service layer is required for encapsulating the business logic and also for centralizing the data access.
We will add a Service class named UniversityService inside the sub-package service of the root package. This class will contain the method getUniversitiesForCountry that will be used to fetch the universities for the given country.
As we can see above, UniversityService does not have much business logic other than calling some external service, and map the response to UniversityDTO and then return the response to the caller.
7. Start the Application
Till now we have written all the code required for our application to run. We will execute the below maven command from the root directory of the project to compile and build the jar.
mvn clean packageOnce the build is complete then we can start the application. Here, we will use IntelliJ to run the application.
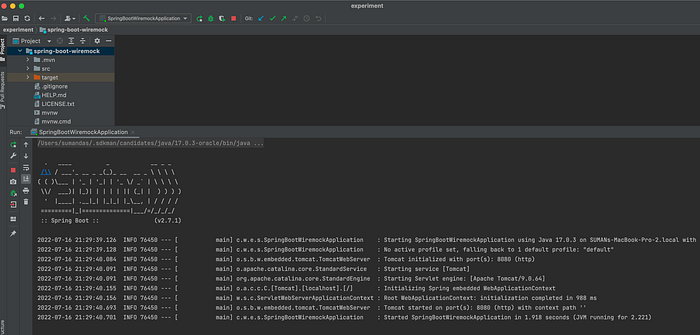
As we can see above, the application started successfully on port 8080.
8. Test the Application with Swagger-UI
Let’s test our universities endpoint using Swagger-UI. Once the application started successfully, we can see all the endpoints for our application using the Swagger-UI. Open the swagger UI and check the endpoint. The Swagger will open at the below URL.
http://localhost:8080/swagger-ui/index.html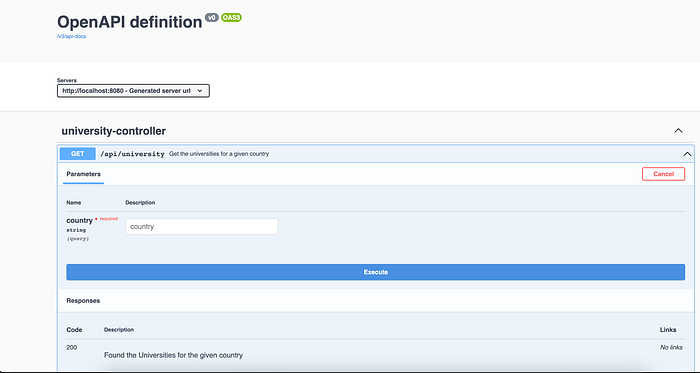
Let’s now test the endpoint for some sample countries.
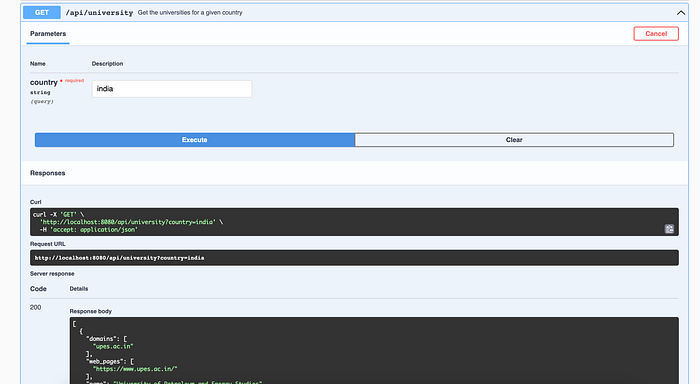
As we can see above, we got the response for the country India. So our application is up and running. Similarly, it can also be tested for other countries.
9. Add Integration Test
Let’s start writing some Integration tests for this application. During Integration tests, we don’t want to call the actual HTTP endpoint. This is less critical for this example, but imagine a scenario where we manipulate the data within the remote application using HTTP POST or PUT. We don’t want this to happen during our tests and instead talk to a stub.
Also, if we connect to the actual remote system for our integration test, the test outcome depends on the availability of the remote service and produces additional dependency. At the same time, we may also want to test different responses (e.g., for different scenarios and status codes).
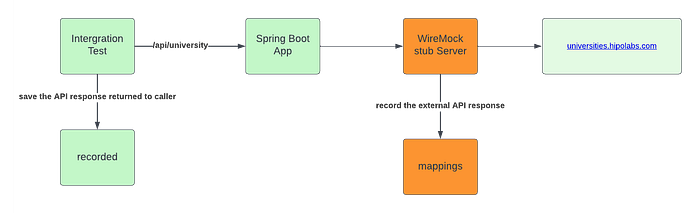
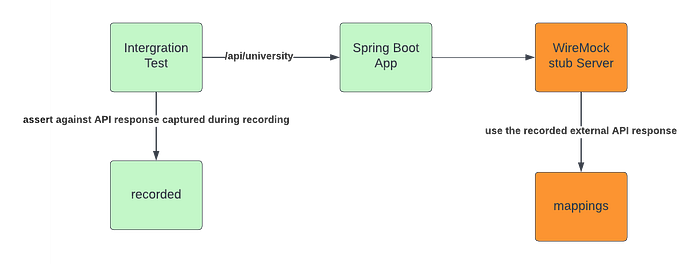
We can resolve the above challenges of connecting to the external API during integration testing using WireMock. With WireMock, we can capture the actual response for a given URL and set the body and status code to whatever we need. Internally, WireMock spawns a local Jetty server that handles the remote calls during our integration tests.
9.1 Add the Configuration File
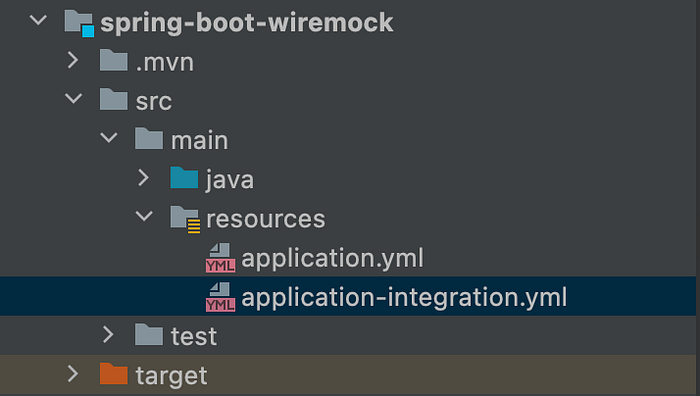
First, we need to add a configuration file name : application-integration.yml inside the “src/main/resources” folder. This file will contain all the configurations, which we need during the Integration test or we want to override during the Integration tests. Here, the term integration in the file name refers to the profile name which we will use during the tests. We have already defined the Java class WireMockConfig in step 3.3 above to read these configurations during runtime.
The file will contain the below configurations:
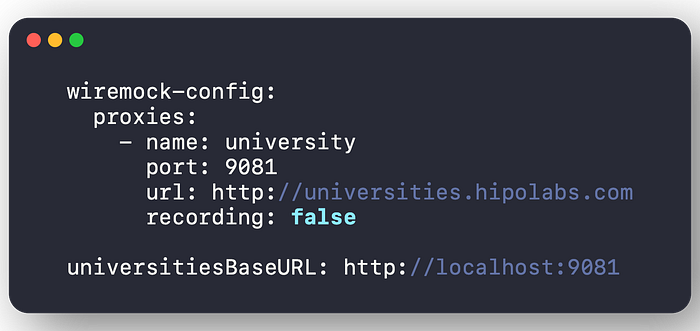
As we have seen above in step 5 we are calling the Universities List API to get a list of universities for a given country. So during our Integration tests, we want WireMock to listen to this URL and return responses from the stubs if present. Here, we are specifying the Mock Server to run at port : 9081 for the base URL : http://universities.hipolabs.com. Any request made to this URL will be intercepted by this Mock Server and will return a response from the source or stubs depending upon the value of the property : recording .
If recording is true then it will call the source and capture the response and return the response to the caller. If the recording is false then it will look into the mappings folder for the captured stubs. If there is a stub matching the required criteria, then it will return a response from the stub to the caller.
Note: We can see above that we have overridden the universitiesBaseURL to the proxy URL.
Here, we have taken proxies in a list format and not as a single entry, although we are calling only one API in this case. This is because if we have to call multiple external APIs, then we can just append the configuration below the current one and it will work.
9.2 Add Test Directories
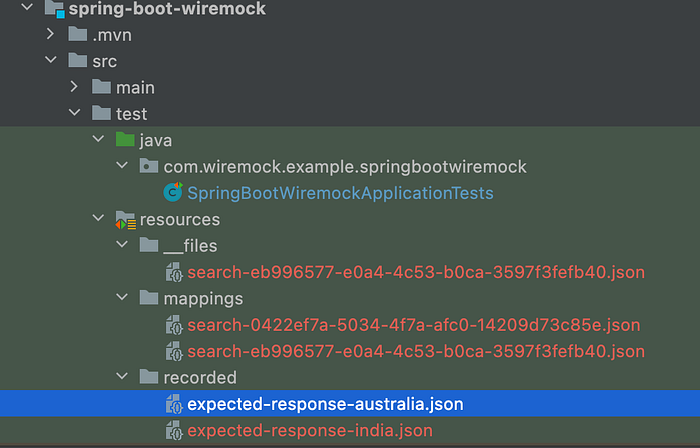
We need to create some directories inside the “src/test/resources” folder for WireMock to record files.
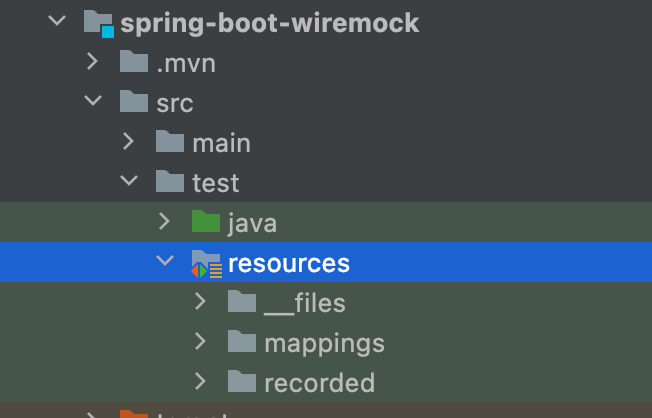
As we can see above, we need to add the following directories for the integration test:
- __file (contains response errors and messages JSON)
- mappings (contains request and response JSON) directories that are needed by WireMock for recording purposes
- recorded directory is used to capture the actual response of the REST API which we will use to compare against our Integration test results
Let’s now start writing the Integration test for the REST API which we exposed earlier.
9.3 Add the Test Case
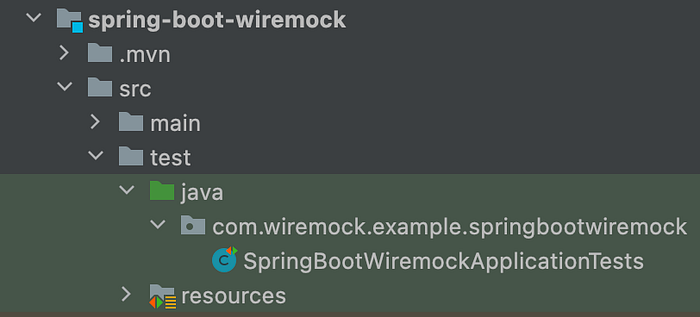
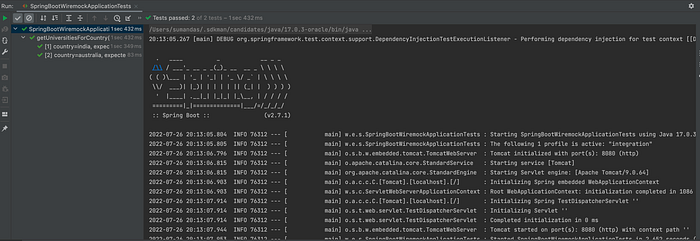
Let’s start with adding a new Integration Test class with the file name : SpringBootWiremockApplicationTests inside “src/test/java” folder.
In the above code:
- Set the active profile: In
line 1we are directing our tests to use the profile:integrationby annotating the test class with the @ActiveProfiles annotation. By settingintegrationprofile as the active profile, the tests will read the configurations from the fileapplication-integration.ymlwhich we defined in step9.1. - Look up main configuration class: In
line 2@SpringBootTestannotation tells Spring Boot to look for the main configuration class (one with@SpringBootApplication, for instance) and use that to start a Spring application context. - Configure auto-configuration of MockMVC: We also have added the annotation @AutoConfigureMockMvc in
line 4because we’ll use MockMvc to call the “/api/university “ endpoint for the test. We could have called the service method directly depending on what kind of test we wanted to implement. In this article, we are trying to demonstrate an example of an integration test by calling the REST endpoints directly with MockMvc. - Start WireMock server and record: From
line 24to36we defined a method called startRecording, which will be executed before every test case. It reads the configuration file defined instep 9.1. Ifrecordingflag is turned on then it will start the WireMock server in recording mode, else it will start in regular mode. - Shut down WireMock server and stop recording: From
line 39to48we defined a method called stopRecording which will be executed after every test case. Ifrecordingflag is turned on then it will stop the recording before shutting down the WireMock server in recording mode or else it will just stop the server in regular mode. - Provide WireMock server configuration: From
line 124to133we have provided some configuration for the WireMock server. It will start intercepting all the requests specified at thewiremock-config.proxies.url. In this tutorial we have specified only one URL :http://universities.hipolabs.com. If the recording is enabled then it will persist the stubs in the mappings folder. While matching against the stubs it will ignore thearrayOrderandextraElementsin the response JSON. - Define integration test case: From
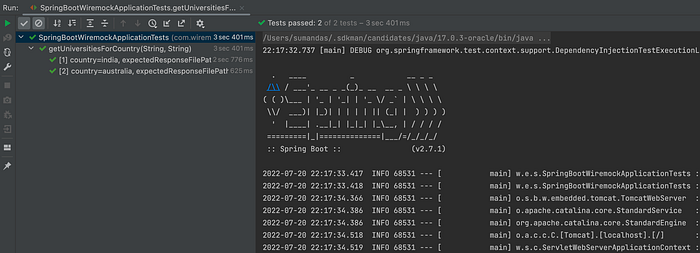
line 51to63we defined the integration test case for the REST API “/api/university”. Here we have used the parameterized test case of JUnit 5. MockMvc is used to call the “/api/university “ endpoint. It then saves the response temporarily in JSON format to compare against the expected response. Here, we are using JsonAssert to compare the expected and actual JSON responses. Once the test case is successful then the current file is cleaned up automatically.
9.4 Record the Test Case
Let’s now see how easily we can record the response of external API and use it during the Integration test. To turn on the recording mode we just need to set recording : true in the configuration defined in step 9.1 above.

Now run the test case. When we run the test case, the response of the external API will be captured inside the mappings folder. The expected response of our API will be captured inside the recorded folder.
9.5 Replay the Test Case
Now everything is in place. We have the Integration Test case ready to be executed. We have all the recorded files in place. Let’s now run the Test case with recording: false .
With recording off, WireMock will try to search the mappings folder for one of the matched responses for the given request. In case it is able to find the response then will return that, else, it will throw an exception saying it’s not able to get any stubbed response.
Let’s modify the recorded response manually to see what happens when WireMock is not able to find the matched response.
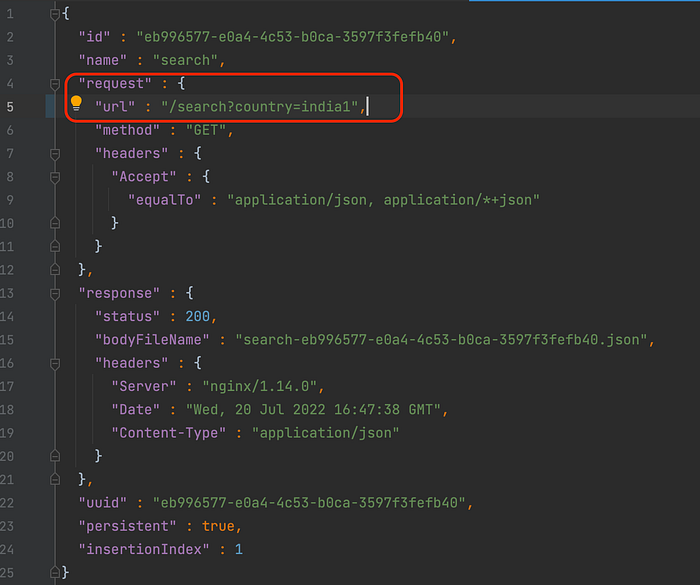
Let’s say we update the country name in the response to india1 from india . to simulate the scenario when we don’t have the recorded file for a given request.
Now let’s run the test case again with recording: false
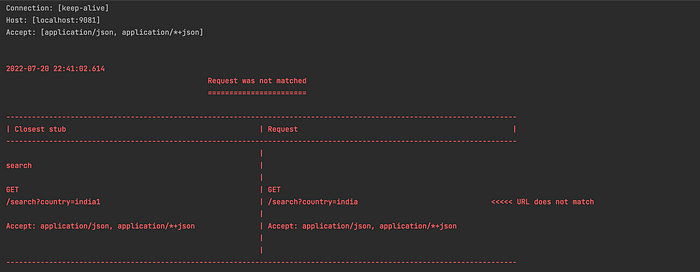
As we can see above, when we run our test case after modifying the response, we got the error Request was not matched. This time WireMock is not able to find any recordings. It also displayed the closest match it can find.
Conclusion
In this article, we saw how we can leverage WireMock in Spring Boot applications to record the requests and responses for external API for various scenarios, and then we can use that recorded files during Integration Test.
If you would like to refer to the full code, do check: